Yah I know guys missed my whacky--ness!
I've checked in most every day just have not had much to say.
I'm going to get the mixing paddles in it than than toss a pound in there and stir it up (CAN'T WAIT)
.
.
For this project (Tobacco Blender) for sake of a better name, you need a few tools.
Drill, better yet a Drill Press
Drill bits
Screw drivers
Adjustable square
Small Wire Nippers
Hack Saw
Nut Driver
You must also have basic skills with electricity for wiring the thing.
Materials:
Some chunks of 3/4 inch board
Wood Screws
1/4 20 bolts, nuts, washers
To fasten the pot to the motor I needed 8 5mm x 30mm bolts, washers, and 8 1 inch nylon spacers
Wire nuts
Masking Tape
Old Ceiling Fan
Old Pot with Lid
1 Door Hinge
16 to 20 inches of 1/16 x 3/4 inch Aluminum Angle (for mixing paddles)
To start remove the light housing if your fan has one, than remove the cover that the fan blades attach too.
With a pen and paper note what color wires go where. After doing this clip the wires. The cover on this side of the motor you may have to work a little to get it off.
The wires for light and fan run through the shaft that the fan motor rides on. You need to pull these wires from the fan side of the motor back through the shaft, so they are coming out the back side (the side that would be against the ceiling). I used a piece of thin stiff wire and bent a small hook on the end to snag the wires one at a time and pull them back through the shaft.
See this photo

Before fishing the wires through the shaft remove the Cotter Pin (shown in the photo below). When finished put it back and also put a piece of protective sleeve material over the wires ( the white sleeve shown in the photo below.

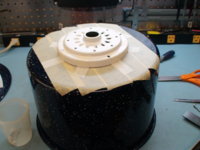
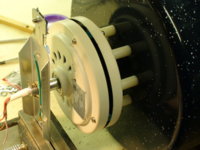
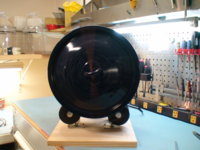
Cover the bottom of the pot with masking tape, than place the fan motor cover on the bottom of the pot and eye ball it for center. Next use the adjustable square measuring from the outside of the pot to the edge of the fan cover, working around the pot to get it centered. After it is centered tape it into place. This is important or your pot will wobble like hell if not centered. (see photo below). My fan cover has 8 threaded holes 5mm to attach the fan blades, I used these to locate and drill (with a smaller drill bit so you don't screw up the threads in the holes of the motor cover) holes in the bottom of the pot so I could fasten the pot to the motor. Drill the holes in the pot a little bigger than the bolts you need to use, mine were 5mm. After drilling the holes I put the cover back on the motor and using the Nylon spacers, 5mm x 30mm bolts, and washers I mounted the pot to the fan motor. (See photos below)
.
Centering the Motor Cover
.

.
After drilling holes the pot mounted to the fan motor
.


I'll finish this tomorrow - Mounting on the boards....


