Buy Tobacco Leaf Online | Whole Leaf Tobacco

1st Time Flue curing, Looking for a bit of advice, Leaf isn't yellowing quick enough.

Status
Not open for further replies.

Orson Carte

Well-Known Member
Joined
Apr 7, 2016
Messages
246
Points
28
Location
New Zealand
The 'Schedule' that I follow, and has been shown in previous postings, is this:
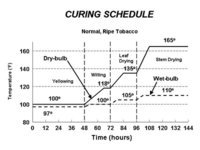
schedule (2).jpg

Following this schedule, Stem Drying requires 12 hours of gradual increase up to 78.8C then 36 hours at that temperature with an 18% RH. (That is, 48 hours on, following 'Leaf Drying').

So, it is perhaps still a little early to anticipate that your stems are dry enough to snap.
 

KiwiGrown

Well-Known Member
Joined
Jan 10, 2018
Messages
105
Points
18
I've seen many differen't schedules ranging from 24 hours to 48 hours some just say "x" hours till dry. I would think it depends on how much is loaded in there and how thick the stems are, I just reached my hand inside though the vent grabbed the thickest stem I could see and it felt rock solid dry.

I'll leave it for now I guess it's not hurting anything.
 

deluxestogie

Administrator
Staff member
Joined
May 25, 2011
Messages
24,852
Points
113
Location
near Blacksburg, VA
The 'Schedule' that I follow...:

View attachment 22876

Flue%20Cure%20Chart.jpg


Notice that part of your chart (the RH) is missing. I don't really pay attention to the RH, except during the yellowing. For the remainder of the run, the rise in temperature pretty much results in the plummeting humidity. The load factor seems to determine how rapidly the temperature changes between one setting and the next, after which the loading should have zero effect on the duration of stage.

Bob
 

KiwiGrown

Well-Known Member
Joined
Jan 10, 2018
Messages
105
Points
18
Flue%20Cure%20Chart.jpg


Notice that part of your chart (the RH) is missing. I don't really pay attention to the RH, except during the yellowing. For the remainder of the run, the rise in temperature pretty much results in the plummeting humidity. The load factor seems to determine how rapidly the temperature changes between one setting and the next, after which the loading should have zero effect on the duration of stage.

Bob

This is the chart i'm using, it's been 24 hours at 165F I cheated a little and raised the temp to 165F about 50% quicker so 32 hours total since moving from leaf to stem drying, as I said I grabbed the thickest stem though the vent and it felt rock solid. Do you think it would be safe to say its done or should I leave it in there longer ?
 

Orson Carte

Well-Known Member
Joined
Apr 7, 2016
Messages
246
Points
28
Location
New Zealand
Regardless of whichever 'chart' you prefer, the Stem Drying component is the same (48 hours) - with a plateau temperature of (around) 165F/78C.

Bob, I really don't follow you when you say 'on my chart, the RH is missing'.
Correct me if I'm missing something, but the RH isn't missing - it's just that it's not obvious until you reconcile the wet-bulb temperature (with the dry-bulb). I just used an online conversion table.
And you only need to ever do it once.
The RH on the plateaus, moving across the chart are 90%, 53%, 37% and 18% - which is pretty much the same as the chart you favour.
The chart I used accompanied an excellent article posted by FMGrowit, 'Another Flue Curing Process' (7-18-2011) and it just seemed to me that the quoted writer knew what they were talking about.
 

Orson Carte

Well-Known Member
Joined
Apr 7, 2016
Messages
246
Points
28
Location
New Zealand
As a postscript:
To tell the truth I've actually been using both of these charts.
The rate of temperature Advance between plateaus on 'Bob's' chart is actually a lot steeper. (eg. from yellowing to wilting is 8 hours, compared to 18 hours, approximately.) And by following the former means I can get to bed at a reasonable hour and just let everything sit on the plateau.
 

deluxestogie

Administrator
Staff member
Joined
May 25, 2011
Messages
24,852
Points
113
Location
near Blacksburg, VA
If you actually have a wet-bulb/dry-bulb thermometer, then the RH line on the graph is redundant. I would guess that the vast majority of amateur FC kilns don't have one. (At the time of its original use in flue-curing, back in the late 19th century, there was no instrument other than the dual thermometer rig to measure RH. Today, we have digital RH instruments, if we choose to use them.) The nominal rate of temp increase is 2°F/hour. My practice (due to laziness) is to crank up the temp in 5°F increments over the same overall time span. I could be more meticulous, but I'm satisfied with my results.

You are doing good. My purpose in repeating the graph that includes the RH plot was to remind newbies that a more complete graph exists. If all you have is an RH sensor, the graph that lacks its plot leaves the user confused. Again, I ignore the RH as well as the wet-bulb plots, and instead just make sure that the humidity is high during yellowing.

As everyone who has undertaken flue-curing soon discovers, the graphs are just the certified, official opinion of best practices (by university extension services) for use in commercial flue-curing. If you follow them rigorously, you get good results. If you simply consider them aspirational, and give it your best shot, you are also likely to get good results.

Bob
 

Orson Carte

Well-Known Member
Joined
Apr 7, 2016
Messages
246
Points
28
Location
New Zealand
I fully understand what you are saying and appreciate that by displaying the humidity curve the second chart is readily usable.
Really, both charts could be combined or individually greatly simplified by the complete elimination of the wet-bulb curve. With accurate digital hygrometers so readily available I cannot understand why anyone nowadays would even think about calculating from a wet-bulb thermometer.
I think I settled on the 'Curing Schedule' as my reference because straight off the bat it just looked 'tidier'.
Although I originally used the wet-bulb curve to calculate the major humidity benchmarks (90%,53%,37%18%), after having done that, that line became irrelevant. My humidity targets are written on the plateaus of the graph, to accompany the dry-bulb temperatures. As for the 'ideal' humidity targets on the advance between plateaus, I think they probably take care of themselves.
One thing I certainly have learned in the discussion of this is that the whole process, though ostensibly a technical one, is because of the raft of variables to be considered, more an art than a science.
 

Orson Carte

Well-Known Member
Joined
Apr 7, 2016
Messages
246
Points
28
Location
New Zealand
Oh my, what was I thinking ...
I've just realised that the conversion I quoted (above) with 165F to Celsius is significantly wrong enough to probably matter.
The Celsius equivalent to 165F is in fact 73.8C, or approx. 74C
 

deluxestogie

Administrator
Staff member
Joined
May 25, 2011
Messages
24,852
Points
113
Location
near Blacksburg, VA
You're fine. When you get above 185°F, it begins to lend a slight caramelized taste to the leaf. Above 191°F will nuke the sole remaining oxidase enzyme, which will halt further aging completely.

Bob

The calculator provided with Windows 10 now has a full list of unit conversion calculators, including temperature. I used to use an online conversion tool, but the Windows 10 calculator is easier and faster.
 

KiwiGrown

Well-Known Member
Joined
Jan 10, 2018
Messages
105
Points
18
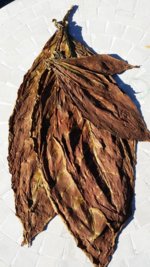
Here's a picture of what came out, 2 Came out sort of light brown and yellow, the rest all look like this. I tried to pick leaves that showed the most yellow still on them.

mutycm.jpg

Edit: I forgot to mention it has an amazing smell, sort of caramelized sugar and stewed fruits, I expected it to smell like nothing at all.
 

deluxestogie

Administrator
Staff member
Joined
May 25, 2011
Messages
24,852
Points
113
Location
near Blacksburg, VA
I've made my share of that color. It won't be as sweet or as acidic as yellow leaf, but looks and sounds mighty smokable.

Just bump out of the yellowing phase sooner.

Bob
 

KiwiGrown

Well-Known Member
Joined
Jan 10, 2018
Messages
105
Points
18
I suspected that it was over yellowed, I'm quite pleased it turned out so uniform in colour, it makes me think the air is well enough circulated in my chamber.

I didnt have much choice at the time with having to sleep that night and then work the following morning, I wasn't sure if it was better then just go from 105f to 115f in 1 jump or wait till I had the time to steep it up slowly.

Even if I had the timing was all wrong I'd have to jump from 115f to 135f for leaf drying too or extent wilt longer, not sure what's the better choice.

I think i'm going to look at a way to automate.
 

KiwiGrown

Well-Known Member
Joined
Jan 10, 2018
Messages
105
Points
18
Just an update I tried some tonight, took the small top leaf and cut it up into ribbon, Not bad at all, a little bitter and hard to keep lite in my pipe but overall the taste of Red Virginia.
 

KiwiGrown

Well-Known Member
Joined
Jan 10, 2018
Messages
105
Points
18
Not sure if the bitterness is due to the leaf being overly ripe or just unaged, it wasn't nearly as harsh as I expected mostly felt it on the retrohale, the nicotine hit however was very strong for a virginia.

Your to kind Greenmonster, wouldn't say it's the prettiest looking leaf but once it's pressed into a plug who cares right.
 

KiwiGrown

Well-Known Member
Joined
Jan 10, 2018
Messages
105
Points
18
Not sure how I'm going to about pressing it, there looks to be a few interesting ways people have done it, do you mean just pressing the whole leaf will change it ?

Might be awhile before I press it into a plug, there will be a healthy amount of perique in the blend and I've not yet started making the perique.
 
Status
Not open for further replies.
Top