MRM
Well-Known Member
So, I have built myself a curing chamber.
The outside dimensions 3' x 4' x 6'.. the way I built it I have an interior of 27.5" x 40" x 60".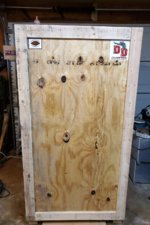
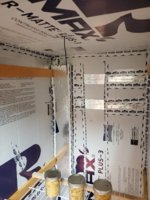
I framed it like a house. 2x4 stud walls, 2x4 framed floor and roof. 1/2" plywood exterior with r35 insulation between all studs on sides and top and bottom. I covered the interior with 1/8" wall board then covered with 1/4" double foil faced duct insulation (came in 5' wide roll and I already had on hand) then covered with 1/2" foil faced exp and all seems taped with tyvek tape.
All framing was caulked with fireproof caulk prior to insulation.
I framed the door facing with 1x4 to provide a good surface to seal, then lined with a heavy foam gasket.
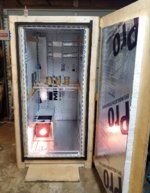
I made the door from 1/2" plywood lined with 1x4 on the outside and secured the door to the chamber using standard door hinges with latches on the opposite side. The door compresses the seal very tight.
I cut and placed a piece of 2" exp on the inside of the door to seal the opening when closed.
I stole the airflow idea from @DGBAMA. A piece of 2" exp 2.5" shorter than the interior with a channel cut out in the back and a muffin fan at the bottom. Pulling air from the top and discharging at the floor. This fan will run continuously.
I stole the heatbox idea from @ChinaVoodoo. I was very familiar with the concept and it was simple to do.
I used an old red metal tool box. Cut a 2.5" hole on each end, from the back side I mounted 3 ceramic keyless sockets and installed 3 300w light bulbs inside the box.
The heat box sits directly in front of the discharge of the air chimney which moves the heat and cools the box and bulbs. The box sits on 2 pieces of ceramic tile.
I used 1/2" exp to make an enclosure for the heat box.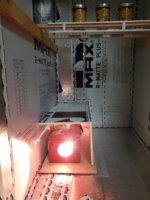
I am controlling the heat with a pid thermostat that I found on ebay for $13. It works pretty dang good.
I used a few electrical boxes and some conduit to clean up the electrical appearance on the exterior.
I wanted the thermostat mounted and easy to see and not move around. I also wanted an exterior plug to avoid having to many cords.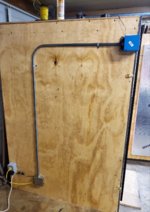

I have installed rails for a top and bottom row of baccy. I will hang the leaves the same way @leverhead hung his in the professional flue cure racking thread.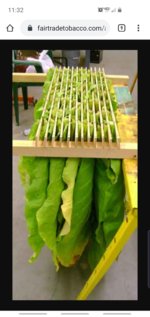
Racking this way, with 6 leaves per rack and deducting for space around the heatbox I should be at about a 500 leaf capacity.
Those figures are based on growing cherry red 401 and figuring 24" - 26" leaf. Bigger leaf will obviously decrease total leaf capacity but I can deal with that.
I will be installing a vent for flue curing and an additional fan in the heat chamber just as a backup precaution. I have a digital hygrometer on order that I will install also.
The latches I used to keep the door closed, you can also see a piece of red oak 1/2" x 1/2" x 7" used as reinforcement for the door around the latch area.
I used a piece of wire shelving sitting on top of 2 pieces of red oak for a shelf and I have some lemon virginia leaf in jars that I will kiln for a week for an experimental kiln run.
I have already ran the chamber for a couple of days then left the door open with only the fan running to expel any fumes there might have been.
The chamber heats very easily. The heat box has no problem reaching 175° and it seems to hold the temp pretty well.
No where on the exterior can you feel any heat at all. The outside of the chamber is as cool to the touch as anything else in the room.
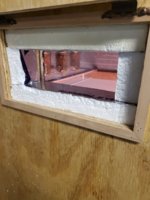
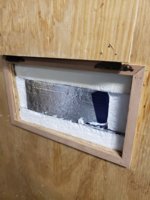
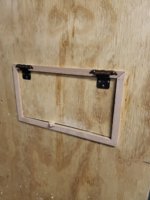
I will be adding a couple of view ports in the next week or two. For those I will cut an opening and frame in some 1/2" thick lexan and overlay the outside of the view port with insulation when not in use.
The outside dimensions 3' x 4' x 6'.. the way I built it I have an interior of 27.5" x 40" x 60".

I framed it like a house. 2x4 stud walls, 2x4 framed floor and roof. 1/2" plywood exterior with r35 insulation between all studs on sides and top and bottom. I covered the interior with 1/8" wall board then covered with 1/4" double foil faced duct insulation (came in 5' wide roll and I already had on hand) then covered with 1/2" foil faced exp and all seems taped with tyvek tape.
All framing was caulked with fireproof caulk prior to insulation.
I framed the door facing with 1x4 to provide a good surface to seal, then lined with a heavy foam gasket.


I made the door from 1/2" plywood lined with 1x4 on the outside and secured the door to the chamber using standard door hinges with latches on the opposite side. The door compresses the seal very tight.
I cut and placed a piece of 2" exp on the inside of the door to seal the opening when closed.
I stole the airflow idea from @DGBAMA. A piece of 2" exp 2.5" shorter than the interior with a channel cut out in the back and a muffin fan at the bottom. Pulling air from the top and discharging at the floor. This fan will run continuously.

I stole the heatbox idea from @ChinaVoodoo. I was very familiar with the concept and it was simple to do.
I used an old red metal tool box. Cut a 2.5" hole on each end, from the back side I mounted 3 ceramic keyless sockets and installed 3 300w light bulbs inside the box.
The heat box sits directly in front of the discharge of the air chimney which moves the heat and cools the box and bulbs. The box sits on 2 pieces of ceramic tile.
I used 1/2" exp to make an enclosure for the heat box.

I am controlling the heat with a pid thermostat that I found on ebay for $13. It works pretty dang good.
I used a few electrical boxes and some conduit to clean up the electrical appearance on the exterior.
I wanted the thermostat mounted and easy to see and not move around. I also wanted an exterior plug to avoid having to many cords.


I have installed rails for a top and bottom row of baccy. I will hang the leaves the same way @leverhead hung his in the professional flue cure racking thread.

Racking this way, with 6 leaves per rack and deducting for space around the heatbox I should be at about a 500 leaf capacity.
Those figures are based on growing cherry red 401 and figuring 24" - 26" leaf. Bigger leaf will obviously decrease total leaf capacity but I can deal with that.
I will be installing a vent for flue curing and an additional fan in the heat chamber just as a backup precaution. I have a digital hygrometer on order that I will install also.
The latches I used to keep the door closed, you can also see a piece of red oak 1/2" x 1/2" x 7" used as reinforcement for the door around the latch area.

I used a piece of wire shelving sitting on top of 2 pieces of red oak for a shelf and I have some lemon virginia leaf in jars that I will kiln for a week for an experimental kiln run.
I have already ran the chamber for a couple of days then left the door open with only the fan running to expel any fumes there might have been.
The chamber heats very easily. The heat box has no problem reaching 175° and it seems to hold the temp pretty well.
No where on the exterior can you feel any heat at all. The outside of the chamber is as cool to the touch as anything else in the room.
I will be adding a couple of view ports in the next week or two. For those I will cut an opening and frame in some 1/2" thick lexan and overlay the outside of the view port with insulation when not in use.


