I wanted to share some of my thoughts on 3D printing molds for personal / hobby use. I hope this can be helpful.
Material: I have found that pla and pla+ are more than adequate for producing molds that are durable and have adequate strength. Some of the more exotic or engineered materials can be used, but I would avoid the materials with embedded fibers (carbon fiber, etc) from a health standpoint. PETG, ABS, ASA could be successfully used, but each are going to come with their own chalenges. Even If you have experience with these materials with good dimensional accuracy, I still would advise PLA+ over these due to some of the thinner features of the mold.
Infill: 100% infill is not required for a strong durable mold. 20-30% is significantly adequate when the molds are printed in the same orientation that pressure will be applied. If you want to increase strength, consider increasing the number of walls used before increasing infill. If 100% infill is your own requirement, ensure that your extrusion is accurate enough to not cause dimensional changes to the walls.
Nozzle: 0.6mm and 0.8mm produce thicker walls, and cut down print time significantly as compared to a standard 0.4mm nozzle. They all work, and all produce enough detail to mold a cigar.
x-y skew: if your printer makes parallelograms instead of rectangles, the mold halves are not likely to go together. This is not always visible to the naked eye. There are tests and calibrations, and they don't take long. I calibrated two ender 3v2s with 2-3 20 minute prints, some dial calipers, and a lead hammer.
Test print: Print a small corner (2-3" square) of the top and corresponding bottom of the mold first before you print the entire model. Make sure the two half's fit together. Not everyone's print settings result in the same dimensional tolerances. I have tried to make molds that take this into account, but I can't fit all cases.
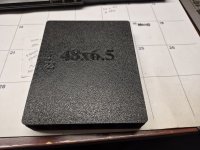
Of all the molds I have printed, they have all been PLA+, all with less than 35% infill, and I have used multiple sized nozzles. I tend to use the 0.6mm and 0.8mm for longer prints. I can get a 44x10 mold printed for under 450g of pla+ which is about $8-9. I use pieces of scrap wood to distribute the pressure across the top and bottom of my mold when using them in mt 20Tn shop press. (obviously I am not using the press to its 100% capacity!) I just use the press to apply enough pressure for both sides of the mold to close. Many other folks are using vevor book presses. I have not had to reprint a single mold to date. No cracks, no plastic creep or deformation.
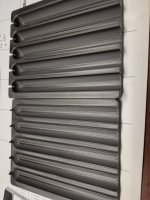
3D printed molds are going to be different than wood molds, but they still get the job done. We all know you don't actually need a mold to make a good cigar, the mold just helps standardize, shape, and compress your rolls before you wrap.
3D printed molds are not going to be significantly different than a production plastic mold, unless you plan to use these in a production environment... then you are probably going to have to reprint a mold half every so often.
3D printing isn't for everyone. You can find tons of constructed molds all over the internet at a reasonable fee. If you already have a 3D printer, this is a pretty easy way to get a mold for your own personal use.


")