Buy Tobacco Leaf Online | Whole Leaf Tobacco

Leverhead's 2013 T Patches; SE Texas

Status
Not open for further replies.

BigBonner

Moderator
Founding Member
Joined
May 22, 2011
Messages
1,671
Points
63
Location
Kentucky
Re: Leverhead's 2013 T Patches

The last trip back, I made it from Southburry to home in 37 hours. That was with a power nap in Kentucky.


What a friend you came to Kentucky and never stopped by . Maybe next time .

Im in the middle of yank and reb
 

Randy

Well-Known Member
Joined
Sep 10, 2012
Messages
253
Points
0
Location
Madison TN
Re: Leverhead's 2013 T Patches

NO! NO! dont ever bring up issue of yank and reb to Leverhead!! {I found this out the hard way} LOL

Randy
 

leverhead

Well-Known Member
Joined
Jan 16, 2012
Messages
3,204
Points
83
Location
Grimes County Texas
Re: Leverhead's 2013 T Patches

What a friend you came to Kentucky and never stopped by . Maybe next time .

Im in the middle of yank and reb

I didn't know you yet. I was pretty close though, I stopped in Lexington.......at like 3:00 AM. It's less than a days drive.
 

Randy

Well-Known Member
Joined
Sep 10, 2012
Messages
253
Points
0
Location
Madison TN
Re: Leverhead's 2013 T Patches

What Id like to know what your doing making trips from Southburry-Houston??? HmHm LOL
 

leverhead

Well-Known Member
Joined
Jan 16, 2012
Messages
3,204
Points
83
Location
Grimes County Texas
Re: Leverhead's 2013 T Patches

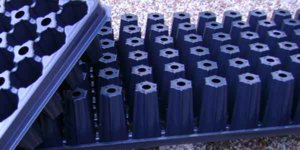
Back on topic again. I wasn't very happy with the starter trays I had last year they were only a little over 2" deep, 72 cells. This year I got a case of Item # 720580C at http://www.amleo.com/to-plastics-star-plug-tray/p/VP-TO-STAR/.
Deep Plug Tray.JPG

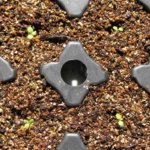
They're still 72 cell, but the cells are 3" deep. 50 will probably last me the rest of my life, I'm pleased with these for now, they're well made. If the roots ball up at the bottom they'll be an inch deeper than last year.

The seed start was in a plastic tub on peat, I posted a picture on 2-11-13. If you notice the finger marks on the surface of the peat, that's where I patted down the peat. It's a bad idea, ignore it. Just drop the container on a firm surface from an inch or so. The roots had a hard time working into the surface. I fed them water for a week and then started spraying them with grow juice.

I am growing a Flue Cured type tobacco and used this guide for how much of what to put in the water. If you're growing a flue-cure variety, save a copy of it.

http://ipm.ncsu.edu/Production_Guides/Flue-Cured/flue_cured.pdf

The amounts were small, so I used a reloading scale with units in Grains and figured everything in Gr (Grains) per Gallon of water. The materials I used were pretty off the wall, but the recipe worked well for me. I didn't want too much Urea in the water, that would kill the seedlings.

13.6 Gr Miracle-Gro 18-18-21

12.7 Gr Grant's stump remover (Potassium Nitrate 13-0-46)

8.8 Gr Ammonium Nitrate (From instant cold packs)

17.5 Gr Epsom salts

1.1 Gr Borax

The wick system I copied from one of the big (rip off) seed companies is pretty simple and it works well for me. It has the pluses of even moisture supply from the bottom and having all the nutrients in the water, easy to measure and correct. The biggest problem seems to be keeping the bottom trays leak free, the bottom corners leave the plastic stretched pretty thin. A quick disassembly to add a piece of plastic sheet fixed it, until I can find better bottom trays the plastic sheet may become a standard part.

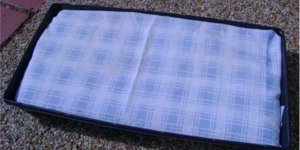
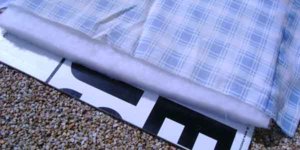
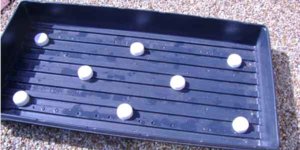
The parts are pretty straight forward, bottom tray (plastic sheet not shown), eight plastic bottle caps, plastic sign material, "Fiber-fill" non woven mat and a top cover/wick.

Bottle Caps.JPGAssy a.JPGAssy b.JPGAssy c.JPG

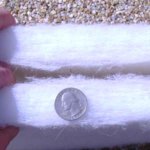
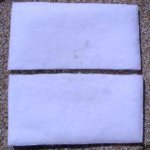
The bottle caps are just stand offs, as long as they're all the same height they're good. They support the sign material leaving a space for the water/fertilizer mix. The sign material is an extruded plastic, in section it looks like corrugated cardboard. It's cut to support the mat, cover and the bottom of the starter tray. There should be 1/4 inch or more clearance all the way around between it and the bottom tray. The mat is a non woven man-made fiber, cut the same size as the sign material. The stuff I had is over an inch thick, I don't think it has to be that thick or multiple layers of thinner material should do. A fabric store should be a good source for a filler for quilts. The mat serves two functions, It acts as a wick across the bottom of the starter tray and it's springy enough to stay in contact with all the bottoms of the cells. The top cover needs to be a fine enough weave to keep the peat/vermiculite mix out of the mat, cut large enough to reach down to the bottom of the bottom tray. It wicks the water mix up to the mat.

Plastic Sign.JPG
Pet Pad a.JPGPet Pad b.JPGStack.JPG

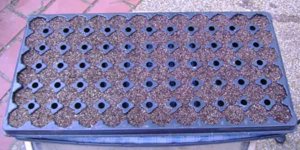
I used a 50/50 mix of peat/vermiculite to fill the trays, with enough water added to just make a ball when squeezed. I put some of the sign material underneath the starter tray to keep the mix from falling out of bottom holes. I filled all the cells loosely with the mix and settled it by dropping the sign and tray an inch or so, a couple of times. Refill if necessary and resettle, scrape the top off level. Lift the tray up high enough to check that the mix went to the bottom of all the cells and didn't fall out, if it keeps falling out add some more water to the mix.

I put a little over a gallon of water/fertilizer mix in the bottom tray, about up to the bottom of the sign material and set the filled starter tray on top. Leave it for a few hours to let the water mix moisten the cells, then add seedlings to taste. I use a pencil to make little holes in the middle of the cells and wet the point a little to pick up the seedlings once the roots start to branch. I pull in enough peat mix to keep the seedling in place and when I'm done with the tray I "spray them in" with water in a spray bottle.
Ready to Go.JPG

After adding water/fertilizer mix at start up, I only add water to make up for evaporation. At four weeks I'll add 15.7 Gr/Gal of Ammonium Nitrate, about 16 Gr per tray and keep making up for evaporation with water. I didn't let them dry out before transplant last year and they were a little too wet to handle well. This year I'm going to dry them out a little bit, I'll update then.
 

Fisherman

Well-Known Member
Joined
Feb 24, 2013
Messages
827
Points
0
Location
Port Lavaca, Texas
Re: Leverhead's 2013 T Patches

#1 is the first of three planned patches. This one is only going to be Southern Beauty to feed the flue-cure fridge. I got my seed from New Hope Seed last year and I thought it suckered real bad. This year I got new seed from Sustainable Seed and I am hoping for better luck. I'm increasing the space between the rows from 3' to 4', I hope it's enough. My plan is for a 3 leaf prime to yield one full layer in the fridge or a 5 leaf prime to give me two slightly less dense layers. Patches 2 and 3 will follow soon.

View attachment 3341

Hi Mr Leverhead,
I was looking at your drawing.... To better enjoy the planned plot... I would... now, this is just my opinion........ I would change the measurements in the top right off said drawing to "36-24-36" as compared to your current plan of "24-36-24"... This could have a profound effect on the planned outcome :)
Mike
 

leverhead

Well-Known Member
Joined
Jan 16, 2012
Messages
3,204
Points
83
Location
Grimes County Texas
Re: Leverhead's 2013 T Patches

Numbers mater! They just don't stay the same for long. A 36DD-24-36 ends up being a 36Long-36-42 after a few seasons. In reality, function is more important than form.
 

Jitterbugdude

Moderator
Founding Member
Joined
May 22, 2011
Messages
4,266
Points
113
Location
Northeast Maryland
Re: Leverhead's 2013 T Patches

I would be a little cautious about using Miracle Grow. Remember FmGrowit lost thousands of seedlings last year from a crappy fertilizer. You should avoid any fertilizer with urea in it.
 

darren1979

First Time Grower
Joined
May 5, 2012
Messages
431
Points
18
Location
Portsmouth, UK
Re: Leverhead's 2013 T Patches

Hell im stealing this idea, i used the same type of trays and filled from the bottom but i noticed the soil was staying too wet so the wicking method will be great for me. Also did you notice an improvement using your grow juice? I didnt use anything last year and it look them a while to get going.
 

leverhead

Well-Known Member
Joined
Jan 16, 2012
Messages
3,204
Points
83
Location
Grimes County Texas
Re: Leverhead's 2013 T Patches

I would be a little cautious about using Miracle Grow. Remember FmGrowit lost thousands of seedlings last year from a crappy fertilizer. You should avoid any fertilizer with urea in it.

I only used a small amount, it worked well for me last year. If I get a chance, I'll post my figures in the next couple of days.
 

leverhead

Well-Known Member
Joined
Jan 16, 2012
Messages
3,204
Points
83
Location
Grimes County Texas
Re: Leverhead's 2013 T Patches

Hell im stealing this idea, i used the same type of trays and filled from the bottom but i noticed the soil was staying too wet so the wicking method will be great for me. Also did you notice an improvement using your grow juice? I didnt use anything last year and it look them a while to get going.

I couldn't remember who had an interest in it, I could remember someone did. The wick seems to limit the supply enough to keep it from water logging. I shortened the stand offs about an inch this year, after a couple of days of dry weather I'm not so sure it was a good idea. Last year I used 1 oz plastic cups as stand offs, I may go back to them. I also used old towels for top covers last year, the cotton would rot but supplied more moisture the higher distance.

The grow juice works good, I haven't changed it from last year. I don't know what kind of scrounging for chemicals you'll have to do over there, I'll be working on the small quantities I bought last year for quite a few seasons. Read the part in that PDF about seedling production, they gave information about what you wanted to end up with in the water in PPM. I don't think it matters how you get there, but it's a target to shoot for. I did the figuring a year ago, but as I remember I started out with an upper limit of MiracleGrow then added Ammonium Nitrate to limit out on Ammonium, then I figured in potassium nitrate for balance. I don't remember if the Epsom salts were an after thought or was part of the figuring, but the Borax was an add on.
 

BarG

Founding Member
Joined
Jun 23, 2011
Messages
5,008
Points
113
Location
Texas, Brazos Vally
Re: Leverhead's 2013 T Patches

Numbers mater! They just don't stay the same for long. A 36DD-24-36 ends up being a 36Long-36-42 after a few seasons. In reality, function is more important than form.

It looks like you been measuring my Ex. Steve!:)
 

darren1979

First Time Grower
Joined
May 5, 2012
Messages
431
Points
18
Location
Portsmouth, UK
Re: Leverhead's 2013 T Patches

Cheers for that leverhead, im reading through the pdf now.

As for the chemical most can be bought off shelf, i'll be getting mine from amazon as they have a lot of food grade products on there.

Just checking the fertiliser ive got kicking around and most of the nitrogen is way of urea, it seems to be hard finding one without it. May have to go into a few local plant centres and see if they have anything off shelf.
 

leverhead

Well-Known Member
Joined
Jan 16, 2012
Messages
3,204
Points
83
Location
Grimes County Texas
Re: Leverhead's 2013 T Patches

These were put into the cells just up to the first two leaves on Saturday, so it will be a week tomorrow afternoon. This picture was taken this afternoon.

SB 030113.jpg
 
Status
Not open for further replies.
Top